Dice have released 8 new articles on the upcoming Battlefield V maps that will be available when the game goes live in November and we have created a shortened version of the Battlefield V Maps list for you and combined them all into one post.
Battlefield V Fjell 652

Once a haven for skiers and climbers, Fjell 652 has become a frozen battleground. Narrow pathways wind around craggy barriers, forcing attackers to tread carefully, and giving defenders the perfect cover for an ambush. Fortifications can mean the difference between holding and losing precious ground, and anti-air emplacements are the best defense against death from above. Battle here among the clouds is as bitter, and ferocious as the blizzards that strike without warning.
Map Overview
This overview is specific to the Conquest mode, the most popular and iconic in the Battlefield series. But these tips are designed to help players succeed in any mode on the Fjell 652 map.
Fjell 652 at a Glance
Units: Infantry – Aircraft
Size: Small
Tempo: Fast
Play Style
Anyone who prefers infantry-focused, rapid close combat is going to spend a lot of time on Fjell 652. This map has a lot in common with the Battlefield 1 map Argonne Forest, particularly its small size and closed environment. Fjell 652, however, isn’t as linear as its predecessor, so it’s less a funnel than an open-air warren of complicated, narrow passages and rocky barriers. Another difference between the two is the addition of aircraft; planes can dart in and around the peaks dogfighting or strafing enemy positions. Control the summit and force the enemy pilots to prove their skills in the gorges below.
Available Game Modes
Fjell 652 offers players the opportunity to take on a wide variety of modes, including:
Breakthrough – Fight to control sectors as an attacker and push the enemy back to claim vital ground in this intense mode.
Conquest – An all-time Battlefield classic, this vast game mode includes up to 64 players who battle for control of key locations on the map.
Domination – Fast-paced, infantry-based combat in close quarters where you’ll see the enemy up close and personal and where the fighting revolves around significant strategic objectives.
Final Stand – There can only be one team left standing, and this tie-breaking conclusion to Grand Operations will determine the winner.
Team Deathmatch – Kill or be killed is the name of the game, inflict as many casualties on the enemy as possible to emerge victorious.
This map is made for Domination and Team Deathmatch modes, with their speed, intensity, and up-close-and-personal combat. Grand Operations is the ultimate multiplayer experience that takes players across fictional in-operation “days,” where each day is represented by a round played on a combination of a map and mode that brings the narrative to life. The actions you, your squad, and your team take on day one will have a direct impact on gameplay in day two, which in result will impact on day three, and so on. Teams surviving their first two brutal “days” of the Norway Grand Operation in Narvik, will ascend here for day three, and (if necessary) day four, where they’ll face their Final Stand amid a howling snowstorm on this desolate peak.
Capture Point A: Artillery Emplacement
There are a total of five capture points that make up this alpine map, and each position contains Ammo and Health stations, though extra supplies can be found in certain locations. There’s also no shortage of anti-air guns and machine gun emplacements scattered throughout.
Let’s start with the first approach, which includes an artillery emplacement. It’s the primary line of Axis defenses, overlooking the city Narvik far below. From the start attackers will be facing a literal uphill battle as they attempt to take Flag A.
Capture Point B: Lookout
The second defensive position perched high above Narvik is the lookout. While it may seem nearly impregnable, the area between Flags B and C is riddled with narrow pathways ideal for flanking the enemy. These paths are too narrow for large engagements, but skirmishes between surprised opposing squads are pretty common.
Capture Point C: Cabins
The cabins of Flag C offer scant, but essential cover for intense close-quarters combat. But beware fire from the cliffs and elevations near Flags A, B and D. They’re a great place to overlook the objective, hunker down, and line up the perfect shot. Aircraft should also be top of mind in this area, though the Fortifications with anti-aircraft emplacements can help even those odds.
Capture Point D: Outpost
Flag D is another prime defensive position and has much in common with the lookout. Keep an eye out for footprints in the snow that lead to winding, claustrophobic pathways that make ambushing enemy squads much easier. Supplies have been parachuted in and are scattered throughout the area, offering both attackers and defenders everything they need to keep the fight going.
Capture Point E: Command Center
The makeshift Axis command center at Flag E consists of a small, snowy plateau dotted with sturdy little cabins. They were built to withstand the often-unpredictable weather, but not heavy fire, so don’t count on them for sustained cover. A thin suspension bridge provides an alternative (though exposed) route. Supplies have been parachuted in and they’re amply spread throughout the area. Anyone making it this far will definitely need them.
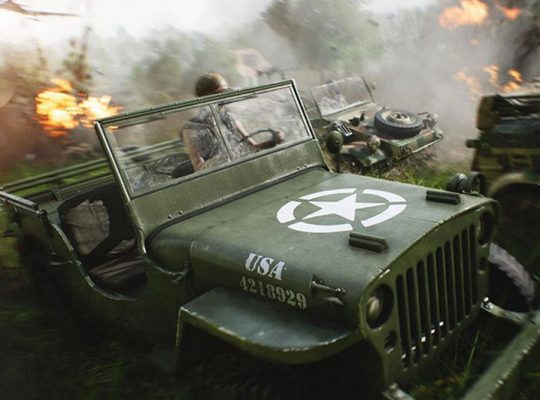
Battlefield V Arras

It’s seemingly serene, this lush French village and its pictorial houses, kissed by the sun and hugged by wall-climbing vegetation. But the scars of Arras run deep – and yet another World War is about to rattle the serenity.
Map Overview
In this rural area, you’ll see shades of the Soissons map from Battlefield™ 1 or even Harvest Day from Battlefield™: Bad Company. The environments are beautiful, but don’t stare too long at the magnificent yellows of the canola fields – enemy tanks or snipers may pick you off.
Arras at a Glance
Units: Infantry – Tanks – Aircraft
Size: Medium-Large
Tempo: Moderate
Playstyle
Arras is about all-out warfare, meaning everybody will have a place and a chance to shine with their personal playstyle. There are open areas where tanks and planes will prefer to fight, but also hectic, infantry-friendly zones like the center of the map, where snipers can take advantage of the bird’s-eye view made possible by the church, the map’s highest point.
For this setting (and for Battlefield™ V in general) we’ve got a killer tip: build Fortifications. On open fields, they give you the option to build trenches, which will be a much wiser way to get around than exposing yourself like a sitting duck. On top of creating new routes, Fortifications can block routes for the enemy, too.
Available Game Modes
Arras offers players the opportunity to take on a wide variety of modes, including:
Breakthrough – Fight to control sectors as an attacker and push the enemy back to claim vital ground in this intense mode
Conquest – An all-time Battlefield™ classic, this vast game mode includes up to 64 players who battle for control of key locations on the map
Domination – Fast-paced, infantry-based combat in close quarters is where you’ll see the enemy up close and personal and where the fighting revolves around significant strategic objectives
Final Stand – There can only be one team left standing, and this tie-breaking conclusion to Grand Operations will determine the winner
Frontlines – An intense tug-of-war battle where one single key area at a time is contested
Team Deathmatch – Kill or be killed is the name of the game; inflict as many casualties on the enemy as possible to emerge victorious.
Grand Operations
The third and potentially fourth day of the Grand Operation Fall of France take place on Arras (the other two days are played on the Twisted Steel map). New to Grand Operations? You’re in for a vast multiplayer experience that takes you across fictional in-operation “days,” where each day is represented by a round played on a combination of a map and mode. The actions you, your squad, and your team take on day one will have a direct impact on gameplay in day two, which in result will impact day three, and so on.
If you’ve reached Arras in Grand Operations, you’ll start off by playing Frontlines. The tug-of-war combat of this mode can be described as a mix of Conquest, Rush, and Battlefield™ 4’s Obliteration mode. Here, both teams fight for control over one flag objective at a time, unlocking the next one to push the frontline towards the enemy base. Conquering the last flag opens the enemy base, making it vulnerable to planted explosives.
The potential fourth day mentioned earlier will be playable only if the two teams are tied after the Frontlines round. This scenario triggers Final Stand, an intense bout on a shrinking playing field, where players need to fight to the bitter end with ammo and health almost depleted. Final Stand is extra dynamic on Arras; it starts off slow and almost peaceful in a vast area before transitioning to chaotic destruction as the area starts contracting, usually towards one of the city areas.
Capture Point A: Water Mill
There are six Capture Points on the Arras map when you’re playing Conquest. These flags are good to know by heart, no matter what game mode you’re playing. Starting with the A flag, we have a control point by a water mill, next to the river. Being a fairly open point, this can be a risky take, however with some Fortification work you can really set up shop here.
Capture Point B: Bridge
Being the flag closest to the Axis HQ, it’s crucial for the German side to hold point B, the bridge, to get easy access to the E Capture Point. If you’re playing on the Allied side, you can shift the tide of the entire round by capturing this. Bring a well-organized squad and give it a go.
Capture Point C: Tank Wrecks
You’ll experience a striking contrast of man-made steel beasts and natural beauty on this capture point. Get to this flag by crossing the canola fields or by taking the safe path through the river. The big, burning tank wrecks provide cover while you dig down and fortify your position.
Capture Point D: Hill Farm
Take control of the hill farm on the northeast corner of Arras to obtain a strong position near the Allied spawn point. From here, travel the routes through the field to get to the Water Mill flag, or make your way into the village.
Capture Point E: Village
An area where infantry thrives, this town center right in the middle of the map can get hectic. Bring your Submachine Guns and Shotguns and wreak havoc in the houses and around the cars. Make good use of the buildings and build a lot of Fortifications to succeed around this flag. Create new routes through houses and block normal routes for the enemy. The tallest point on the map, the village’s church is a beacon for everyone on the map and a great place for sniping.
Capture Point F: Field
Vehicle fans can bring their tanks all the way to the east and capture this point. Alternatively, run over here as infantry and crouch down in the flowers. Take your time and dig trenches to allow easier access to (and from) the flag.
Battlefield V Devastation

Rotterdam’s beautiful and complex architecture built tall by hands and machinery now rests scattered as heaps of rubble in Battlefield V’s Devastation map. The range, trajectory, and explosive yield of bombs dropped from above have reshaped the city into a no-man’s-land of ash and remains for soldiers to fight over.
This survey of the Devastation map will help players find their way in the dark, unrecognizable streets.
Map Overview
This overview is specific to the Conquest mode, the most popular and iconic in the Battlefield series. But these tips are designed to help players succeed in any mode on the Devastation map.
Devastation at a Glance
Units: Infantry/Tanks
Size: Medium
Tempo: Fast
Playstyle
Devastation is an unconventional Battlefield map marked by periods of intense close-quarter firefights, created by the same mind behind Battlefield 1’s Fort de Vaux.
Direct roads have warped into an aimless blend of claustrophobic avenues of approach, obstacles, and defensive positions. Players will have to fight among these ruins, dried out canals, and the metal skeletons of buildings. Several places, most notably the cathedral, still retain their shape and can be used as defensive strong points. The abundance of cover left by the bombardments works both ways, so you’ll have to outsmart your enemy and not get trapped in a meat grinder.
Available Game Modes
Devastation offers players the opportunity to take on a wide variety of modes, including:
Breakthrough – Fight to control sectors as an attacker and push the enemy back to claim vital ground in this intense mode.
Conquest – An all-time Battlefield classic, this vast game mode includes up to 64 players who battle for control of key locations on the map.
Domination – Fast-paced, infantry-based combat in close quarters is where you’ll see the enemy up close and personal and where the fighting revolves around significant strategic objectives.
Final Stand – There can only be one team left standing, and this tie-breaking conclusion to Grand Operations will determine the winner.
Frontlines – An intense tug-of-war battle where one single key area at a time is contested.
Team Deathmatch – Kill or be killed is the name of the game; inflict as many casualties on the enemy as possible to emerge victorious.
Days three and four of the Battle of Holland Grand Operation – which begins in Rotterdam – take place here. Grand Operations are the ultimate multiplayer experience that takes players across fictional in-operation “days,” where each day is represented by a round played on a combination of a map and mode that brings the war narrative to life. The actions you, your squad, and your team take on day one will impact gameplay in day two, as well as day three, and so on.
Up to 64 players battle for what’s left of the city on day three in Frontlines and if neither side has been ground to defeat, day four will exhaust combatants to the last soldier in Final Stand.
Capture Point A: Train Wreck
This collection of destroyed trains and tracks is the nearest Flag for the Axis and the best place to stage a takeover of Flag C, the central hub of Devastation. The overturned platforms provide an elevated perch to hold off incoming foes. What’s left of the train tracks can be used to move to the outskirts of Flag D to either deny an attack or contest the site.
Capture Point B: Library
One of the few recognizable landmarks within Devastation, Flag B operates as a flanking position for either Axis or Allies. Bombs have shaved the top from the library, leaving every room with a view but, thankfully, all planes are long gone. What’s left of the walls and doorways across the three floors are good interior hiding spots, requiring a constant patrol to keep enemies out.
Capture Point C: Cathedral
This is the centerpiece of Devastation. The monochromatic grey walls are colored by kindled pyres and whatever light can pierce through the smoky sky. This is where squads coordinate with all four Classes to wage non-stop, hectic battles to capture this massive landmark. Claim the location and brace for a barrage from all sides, since Flag C is surrounded by every other capture point.
Capture Point D: Cinema
To the east is the last reminder of a modern city. The intact neon signs light the way to a Flag enclosed by shattered glass, steel, and rubble. A few rows of seats still await an audience, but the cinema is only showing one film genre these days: war. Flag D is the natural expansion point for the Allies, who can move on the train tracks to attack Flag A or stage an assault on anyone unfortunate enough to get caught leaving the cathedral.
Capture Point E: Old Mall
Flag E is ideal for the Allies and an obvious maneuver point into the cathedral. The involuntary outdoor mall is ripe for urban skirmishes between what’s left of the outer walls. The ground floor has caved into the parking garage below, creating another arena for control. If you captured this Flag but not the nearby Flag C, try to look up, because the mall faces the tallest side of the cathedral, where a good Recon or Assault player can pick off careless soldiers.

Map Overview
This map is one of two inspired by the Norwegian Campaign, which took place in the spring and summer of 1940, in the northern port city of Narvik and the surrounding mountains (the other is the Fjell 652 map). Allied and Axis troops skirmish for control of this strategically vital location and the rich iron-ore (a critical wartime supply) transported by the city’s railway.
This overview is specific to the Conquest mode, the most popular and iconic in the Battlefield series. But the tips below are designed to help players succeed in any mode on the Narvik map.
Narvik at a Glance
Units: Infantry/Tanks/Aircraft
Size: Medium-Large
Tempo: Moderate-Fast
Play Style
If you’re looking for a solid map with a little something for everyone in terms of play styles, Narvik is a great choice. Whether you want aggressive, close-quarters combat in the now ruined streets of the city center, or more open battle with clear line-of-sight options for Recon snipers down by the harbor, you’ll find it here. Climb into the cockpit of a Spitfire and rain death from above on enemy positions or tear through war-torn neighborhoods in a Panzer, grinding formerly charming houses beneath your treads. Narvik is the very definition of all-out war.
Available Game Modes
Narvik offers players the opportunity to take on a wide variety of modes, including:
Airborne – Parachute on to the battlefield and spearhead an invasion or scramble to defend and fortify your positions from the oncoming attack.
Breakthrough – Fight to control sectors as an attacker and push the enemy back to claim vital ground in this intense mode.
Conquest – An all-time Battlefield classic, this vast game mode includes up to 64 players who battle for control of key locations on the map.
Domination – Fast-paced, infantry-based combat in close quarters where you’ll see the enemy up close and personal and where the fighting revolves around significant strategic objectives.
Frontlines – An intense tug-of-war battle where one single key area at a time is contested.
Team Deathmatch – Kill or be killed is the name of the game, inflict as many casualties on the enemy as possible to emerge victorious.
The first two days of the Norway Grand Operation take place here (day 3, and if necessary, day 4 take place on the second Norway map, Fjell 652). What is Grand Operations? It’s the ultimate multiplayer experience that takes players across fictional in-operation “days,” where each day is represented by a round played on a combination of a map and mode that brings the narrative to life. The actions you, your squad, and your team take on day one will have a direct impact on gameplay in day two, which in result will impact on day three, and so on.
Day one begins with Allied paratroopers dropping into the Axis-held city under cover of darkness in Airborne. With good timing (and a little luck) attackers can even airdrop behind enemy lines where the low light and blowing snow acts as perfect cover. Day two begins with defenders deeply entrenched throughout the town, while attacking forces attempt to gain and hold one sector after another in Breakthrough mode.
Capture Point A: Artillery Base
In all this map contains six capture points, many at different elevations and each presenting its unique challenges. Let’s start with Flag A (the artillery base), located on the snowy ridges. Defenders have the definite advantage here as it’s prime real estate for Fortifications and attackers must fight their way uphill (generally under heavy fire). During the first day of Grand Operations, Allied transports drop paratroops under cover of darkness as Axis troops dig in and try desperately to hold the town.
Capture Point B: Train
Flags B can be found at the train yard, located on the low-lying, southern portion of the map near the harbor. It includes a cargo train and a double-level platform. The two levels of the latter are frequently contested, leading to some genuinely high-intensity fights. Though it’s inaccessible to vehicles, there are many flanking routes available for players to discover (keep an eye out for scaffolding and ladders to find them), so there’s never a dull moment. Players can also find an Ammo cache on the lower platform if they need to reload in a hurry.
Capture Point C: Town
Flag C is located in the open town center, which tends to attract the most aggressive close-quarters combat. There’s plenty of cover here in and around the remaining multi-story homes. It’s an excellent area for strategic Fortifications, but remember, what goes up can definitely come down. Here in the city center destruction of anything and everything is the name of the game. Players will be able to find Vehicle repair, Ammo and Health stations in this highly-contested area.
Capture Point D: Loading Bay
The loading bay (Flag D) lies directly south of the town center and includes a two-level dock bridge. The upper deck provides a clear view of oncoming enemies but little in the way of natural cover, though it can be reinforced with Fortifications. The capture zone for this flag is quite large, allowing teams to hold the area from multiple locations in and around the dock. And the area includes both Ammo and Health stations, one on each level, plus a Vehicle repair station further north.
Capture Point E: Ammo Depot
Anyone looking for some high ground should head to Flag E, the ammo depot, on the ridge behind the houses. This capture point’s elevation makes it ideal for defensive emplacements, Fortifications, and resupply stations. There are a battery of gun positions that allow for good low ground coverage of this capture point and that of the town center. Check behind the houses for both Ammo and Health stations.
Capture Point F: Ore Depot
Finally, the ore depot (Flag F) can be found at the port. This industrialized area is quite open but offers a great deal of cover from crates to abandoned train cars. Recon players who position themselves at the tops of iron ore mounds and on the nearby hillsides will love this spot with its clear sight lines for sniping opportunities. It’s also open enough for serious vehicle-versus-vehicle action. Look to the middle ground between the two large buildings for Health and Ammo stations.

Map Overview
Twisted Steel is one of the two Battlefield V multiplayer maps set in France, the other being Arras. While not portraying a specific historical event, Twisted Steel is heavily inspired by the events at the fortified sector of the river Escaut in 1940, on the border between Belgium and France.
Apart from the aforementioned impressive fallen bridge, you’ll fight in villages, across fields, and along a river on a map designed to bring those rural, Europe-based World War 2 fantasies to life.
Twisted Steel at a Glance
Units: Infantry/Tanks/Aircraft
Size: Large
Tempo: Moderate – Fast
Playstyle
Vastness and location variety make all playstyles valid on Twisted Steel. Everybody has their place and there’s plenty of room for both infantry, large vehicles, and planes to make a mark. If you deploy in a land vehicle, you may prefer be roaming in the swamp area north of the bridge. If you’re playing as infantry here, use the vegetation as cover – but remember that the trees are destructible, and the landscapes may change drastically. If you’re into close-quarters fighting, you’re likely to spend a lot of time in the small village south of the bridge, where buildings and trenches provide cover.
No matter your playstyle, Twisted Steel’s green/gray color palette, open fields, tall vegetation, trenches, and ambush opportunities may make this your favorite map when it comes to experiencing iconic WW2 scenarios.
Available Game Modes
Twisted Steel gives you the opportunity to take on a wide variety of modes, including:
Airborne – Parachute on to the battlefield and spearhead an invasion or scramble to defend and fortify your positions from the oncoming attack
Breakthrough – Fight to control sectors as an attacker and push the enemy back to claim vital ground in this intense mode
Conquest – An all-time Battlefield classic, this vast game mode includes up to 64 players who battle for control of key locations on the map.
Domination – Fast-paced, infantry-based combat in close quarters is where you’ll see the enemy up close and personal and where the fighting revolves around significant strategic objectives.
Frontlines – An intense tug-of-war battle where one single key area at a time is contested
Team Deathmatch – Kill or be killed is the name of the game; inflict as many casualties on the enemy as possible to emerge victorious.
Grand Operations
The first two days of the Grand Operation Fall of France take place on Twisted Steel (the other two days are played on the Arras map). If you’re unaware of Grand Operations, it’s Battlefield V’s most vast multiplayer experience that takes players across fictional in-operation “days,” where each day is represented by a round played on a combination of a map and mode that brings the narrative to life. The actions you, your squad, and your team take on day one will have a direct impact on gameplay in day two, which in result will impact day three, and so on.
In this particular Grand Operation, day one begins with Axis forcers paradropping down to the French countryside along the river Escaut in Airborne mode, attacking the Allied positions. Day two is all about Breakthrough mode, where attackers and defenders face off, battling over sectors, one at a time. Play the objective and support your squad during these two days, and your team will gain an edge when the operation reaches Arras for the remaining day(s).
Capture Point A: Silo
Going through the capture points – a.k.a. flags – you’ll fight over in Conquest mode will give you a good overview of Twisted Steel’s different areas. Let’s start with the silo, the closest flag to the Axis HQ. The Axis team needs to maintain control of this flag to stage attacks deeper into the map towards the stone bridge connecting it to Flooded Farm (see Capture Point C). Use anti-vehicle Fortifications and the surrounding buildings to control this flag. The capture point’s location also allows for a great flanking opportunity if a team has locked down the B flag, as it lets you deploy close to the back connection of the vast bridge.
Capture Point B: Bridge
Fight on top of it or under it. Climb the ladders situated on its pillars – or fight on the actual pillars themselves, secured by your newly-built Fortifications. The giant bridge on Twisted Steel’s B flag is something you could easily spend an entire round on due to its dynamic nature. Owning this flag gives your team sniper positions overlooking the rest of the map. It has strong fortification possibilities in both directions, effectively making it a roadblock in the middle of the bridge. Team play and maintaining Fortifications are critical for holding this flag against enemy attacks.
Capture Point C: Flooded Farm
Even though this flag is located on the lowest elevation of the map, farmhouses and Fortifications provide plenty of infantry cover, and supply stations give you the means to defend the flag from assaults coming across the bridges. Use explosives to destroy the bridges and slow down enemy attacks. The middle barn has strong Fortifications that make it an effective fortress against attackers advancing from both Capture Points A and F. Don’t miss the field gun constructible just outside of the flag area, on the main road.
Capture Point D: Swamp
To the north of the bridge, you’ll find a more open swamp area. Its scattered islands are ideal hunting ground for tank drivers seeking to ambush enemies or engage in close-quarter tank battles. Enemy attacks from the higher elevations are always a threat when attempting to hold this flag. Flag D has one of the largest territories when it comes to capturing it, so use the different stationary weapon positions scattered around it, both when attacking and defending.
Capture Point E: Sabotage
This is the destroyed section of the bridge, full of the remains of a destroyed military convoy. Rubble is everywhere; you’ll fight alongside burning wrecks, overturned vehicles, and even a crashed plane. This Capture Point can be difficult to take, and the limited Fortifications make it hard to hold. Squads defending this flag should use the elevated bridge sections and place explosives. The underside of this area is a good place to approach enemies, forcing them to leave their positions on the two upper breakpoints of the bridge.
Capture Point F: Village
This small collection of residential buildings provides ideal elevated positions for ambushing enemy tanks. With plenty of Fortifications, health and ammo stations, and choke points, a talented squad can hold this flag against larger forces. Allied teams will want to always control this flag when preparing to assault the Flooded Farm C flag. It also has a deadly stationary gun that tank commanders should be wary of; its location in the village gardens make it deceptive.
Capture Point G: Overlook
Last but not least, there’s Overlook, found close to the Allied HQ at the map’s northeast part. Its military trenchworks provide ideal defensive positions to combat Axis tanks assaulting from the swamp. Farm houses and Fortifications ensure that infantry combat can thrive at this flag, although the more open terrain makes it difficult to hold against determined armored assaults. Overlook is a Capture Point split into two distinct areas – use it to fight or fall back to when enemies advance and take either area.
Map Overview
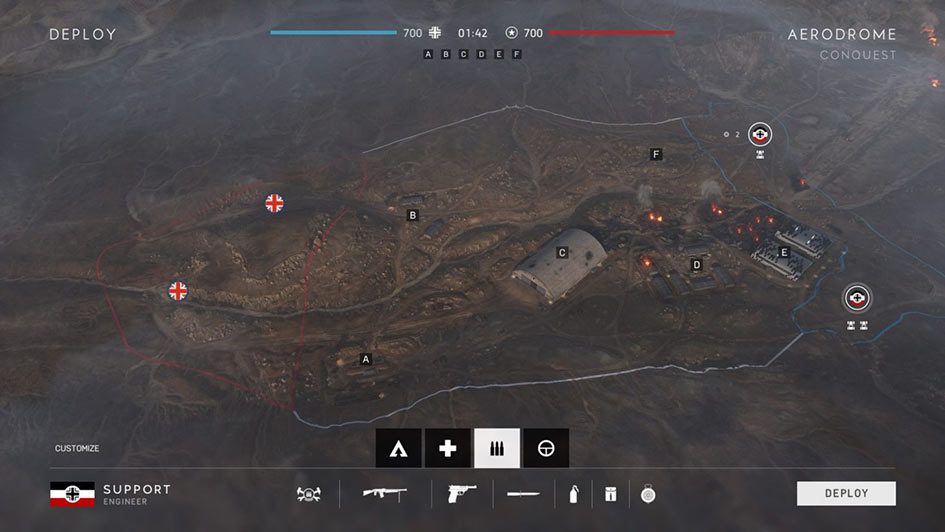
Aerodrome is loosely based on the British attacks on German installations, supply lines, and airfields in the Libyan desert in 1942–1943. Commandeered by Erwin “The Desert Fox” Rommel, the German troops were forced to retreat westward through Libya and eventually surrender following the attacks.
Dominating the landscape of this airfield (or, indeed, “aerodrome”) is a central hangar. A key strategic point that can be heavily fortified and defended, this will be a nest for infantry clashes, but daring tank pilots may also try their luck in what will be a severely contested area.
Aerodrome at a Glance
Units: Infantry/Tanks
Size: Medium
Tempo: Moderate-Fast
Playstyle
The action on Aerodrome will take place on land, with infantry and land vehicles battling it out. Excluding air combat, all playstyles are supported; fans of close-quarter infantry combat will shine on the busy C flag, and land vehicle operators will have a blast rushing through the desert roads. There are many Fortification opportunities, which gives extra weight to Support players, and the map’s high points provide good sniping spots.
Available Game Modes
Aerodrome offers players the opportunity to take on a wide variety of modes, including:
Airborne – Parachute on to the battlefield and spearhead an invasion or scramble to defend and fortify your positions from the oncoming attack
Breakthrough – Fight to control sectors as an attacker and push the enemy back to claim vital ground in this intense mode
Conquest – An all-time Battlefield classic, this vast game mode includes up to 64 players who battle for control of key locations on the map
Domination – Fast-paced, infantry-based combat in close quarters where you’ll see the enemy up close and personal and where the fighting revolves around significant strategic objectives
Final Stand – There can only be one team left standing, and this tie-breaking conclusion to Grand Operations will determine the winner
Frontlines – An intense tug-of-war battle where one single key area at a time is contested
Team Deathmatch – Kill or be killed is the name of the game; inflict as many casualties on the enemy as possible to emerge victorious.
Capture Point A: Depot
A railway passage to the Aerodrome, the Depot is one of the two flags that the Allied side normally will attack first. Capture the point to reward your team with a tower overlooking both the Aerodrome Capture Point and parts of the B flag. The Depot can be an easy capture for a sneaky squad seizing the opportunity while the majority are fighting for the Aerodrome flag. Move to its elevated areas to see if enemies are knocking on the door.
Capture Point B: Checkpoint
Another point close to the Allied starting position – roll over the hill pass towards the west with your squad to attack this one. Once you’re in control, Recon players can grab the elevated shelf called Overlook to cover the rest of their squad pushing into Control Points like the Barracks. The Axis team can capture this point to cut the Allied main road to the Radar flag. Mine the road and make sure someone with a Panzerfaust covers the Hill Pass. Although Fortifications favor the Allied side in this area, there’s a trench by the eastern barrack where the Axis team can dig down in cover of elevated long-distance shooters.
Capture Point C: Aerodrome
The heart of the map, point C will be high up on both teams’ wish lists. The outer corridors of the aerodrome hangar will be an infantry grind fest, while the open floor between the Stuka and Ju 88 planes is sure to induce paranoia for anyone fighting there. By holding the Aerodrome, your team can spawn on a very useful hub, which they can use to quickly attack flags A, B, D, and F. To do this, locate the Supply Stations and fortify the aerodrome’s hangar doors to cut the other team out.
Capture Point D: Barracks
Players on point D will probably be busy with either deflecting incoming attacks or providing long-distance cover to squad mates moving toward nearby flags (use the handy water tower to achieve the latter). This is a great position for short access towards points like the Aerodrome. The Barracks are not easily accessed with tanks, but if you manage it, lick your vehicle wounds at the Vehicle Supply Station between this point and the Hangars.
Capture Point E: Hangars
Close to the northern Axis HQ, this is one of the first two flags to grab if you’re deploying on the German side. You’ll fight near the remains of a British air assault and debris from destroyed planes along the airstrip. Make use of the cover inside the small hangars and fortify the northern hangar entry to defend against attackers.
Capture Point F: Radar
This is one of the map’s elevated points, where players can snipe to their hearts’ content while also defending a flag. If snipers from the Overlook flag harass your teammates, you can fortify the edge of the Radar ridge and pick them off one by one. Another valid strategy is to jump inside the radar building and cover your squad pushing towards the B, C, and D flags.

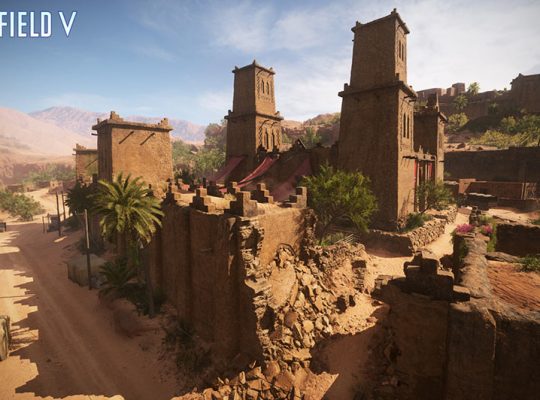
Map Overview
Hamada is one of two Battlefield™ V maps set in North Africa (the other being Aerodrome) and inspired by a strategic point between Libya and Egypt. This area was the scene of pivotal battles between the Axis and Allies during 1941 and 1942.
This overview is specific to Conquest mode, the most popular and iconic in the Battlefield series. But these tips are designed to help players succeed in any mode on the Hamada map.
Hamada at a Glance
Units: Infantry/Tanks/Aircraft
Size: Very large
Tempo: Moderate
Playstyle
Can’t wait to leap into the cockpit of a fighter plane or behind the turret of a tank? This Battlefield V map is made for you. Ferocious vehicle combat is the focus of this all-out warfare map, but you’ll also need boots on the ground to take and hold the objectives. Infantry will need to focus on what scant cover they can find on the lower elevations, and head to the high ground to really make a difference. And speaking of heights, the flyable space on this map is immense, making it perfect for both intense dogfights and deadly strafing runs.
Available Game Modes
Hamada offers players the opportunity to take on a wide variety of modes, including:
Airborne – Parachute onto the battlefield and spearhead an invasion or scramble to defend and fortify your positions from the oncoming attack
Breakthrough – Fight to control sectors as an attacker and push the enemy back to claim vital ground in this intense mode
Conquest – An all-time Battlefield classic, this vast game mode includes up to 64 players who battle for control of key locations on the map
Domination – Fast-paced, infantry-based combat in close quarters is where you’ll see the enemy up close and personal and where the fighting revolves around significant strategic objectives
Frontlines – An intense tug-of-war battle where one single key area at a time is contested
Team Deathmatch – Kill or be killed is the name of the game; inflict as many casualties on the enemy as possible to emerge victorious.
Capture Point A: Ridge Nest
This gigantic map includes seven capture points at a variety of elevations. We’ll begin with Flag A, which is closest to the Allied HQ. Surrounded by low cliffs and boulders, there’s very little in the way of natural cover. This makes the area difficult to defend, but with a bit of foresight, full Fortifications, and the plentiful Supply Stations, infantry has a chance at holding out against vehicle assaults.
Capture Point B: Artillery Camp
Split between two levels, Flag B includes a multitude of vehicle routes leading up to elevated areas perfect for infantry. Fortifications are essential for denying vehicles access, and infantry will need to rely on the trenches and plentiful supply boxes as cover. Strategically speaking, the artillery camp is the ideal launching point for an assault on Flag D.
Capture Point C: Oasis
This desert oasis is no mirage. Vehicles will find the area extremely hard going given the dense clusters of rocks and rubble. They provide plenty of infantry cover and make vehicle movement difficult at best. To hold this area, head for the high ground overlooking the flag, which provides the best defensive position by far.
Capture Point D: Bridge Camp
There are many reasons your team will want to hold this flag; one of the most important is that it grants your forces an additional tank. Second, it gives you control of the bridge leading to the ruins. The bridge is the fastest path to Flag E and a vital choke point for those who can take it. Additionally, the ruined towers provide elevated defensive positions and overall safety from vehicles. For all these reasons and more, holding this flag is critical for a team seeking victory.
Capture Point E: Desert Ruins
The skeletal remains of ancient buildings press close around this flag area, giving it an almost claustrophobic atmosphere. Vehicle drivers should use extreme caution when approaching these ruins as they’re ideal for infantry ambushes, especially from above. That’s not the only danger to be found, either, as the artillery cannons throughout provide excellent coverage of the lower areas.
Capture Point F: Temple
Tank drivers should probably avoid the temple at all costs. This infantry-focused area not only allows for the use of barbed wire and sandbags to control access to the flag but provides swell elevation for defenders to launch surprise attacks. Enemy tanks approaching Flag F should pay particular attention to the tall temple ruins, the most likely place defenders will choose to ambush the unwary.
Capture Point G: Peak Camp
Could your team use an extra plane? Then you’ll want to control Flag G. High atop a plateau, this Axis stronghold leaves no room for retreat. The area is worth defending though, as it also includes an airstrip for Axis planes to take off from. Infantry will need to hug the edges of the capture area, using scattered military hardware for cover, when battling enemy vehicles as there are few Fortifications.

Map Overview
The Rotterdam map is inspired by an unfamiliar conflict of World War 2, set in May 1940. Expecting little resistance, the German military pushed through the city of Rotterdam, but were met by fierce opposition from the Dutch military.
This overview is specific to the Conquest mode, the most popular and iconic in the Battlefield series. But these tips are designed to help players succeed in any mode on the Devastation map.
Rotterdam at a Glance
Units: Infantry/Tanks
Size: Medium
Tempo: Moderate-Fast
Playstyle
Consider Rotterdam a spiritual successor to the Battlefield 3 Seine Crossing map with a hint of Amiens from Battlefield 1. It’s an urban environment decorated by canals, tall buildings, and a marketplace that no longer soothes pedestrians but preludes close-quarter firefights. The railway provides an elevated position to move across the map or oversee chokepoints with a ranged weapon from east to west – but is still dangerous if you don’t keep an eye on the railcar next to you.
Wide main roads support vehicular combat, and narrow alleys are where players discover who’s the better squad. The not-yet destroyed Rotterdam allows more room for vehicles than its counterpart, Devastation.
Available Game Modes
Rotterdam offers players the opportunity to take on a wide variety of modes, including:
Airborne – Parachute on to the battlefield and spearhead an invasion or scramble to defend and fortify your positions from the oncoming attack.
Breakthrough – Fight to control sectors as an attacker and push the enemy back to claim vital ground in this intense mode.
Conquest – An all-time Battlefield classic, this vast game mode includes up to 64 players who battle for control of key locations on the map.
Domination – Fast-paced, infantry-based combat in close quarters where you’ll see the enemy up close and personal and where the fighting revolves around significant strategic objectives.
Frontlines – An intense tug-of-war battle where one single key area at a time is contested.
Team Deathmatch – Kill or be killed is the name of the game; inflict as many casualties on the enemy as possible to emerge victorious.
Capture Point A: Train Station Beurs
In the west is Flag A, situated directly under the railway and flanked by sets of stairs. At first glance, it will feel exposed to enemy fire from the surrounding streets and buildings. But a Support Class soldier and squad mates can quickly transform the open area into a Fortification of sandbags and mounted machine guns. When fully Fortified, this becomes the largest piece of Fortifications on Rotterdam. However, the wide streets leave this area susceptible to tanks attacks.
Capture Point B: White House
You can probably find the route to Flag B by looking up, since it’s characterized by the large, landmark White House. Two levels keep much of the battle indoors and a squad’s Fortifications can fend off enemies rotating from Flag D at bay. Once a team has fortified the White House, the Point becomes the classic the stuff of WW2 films, where you will be commanding a center point and just holding it against attackers with everything you’ve got. But beware the maze of back allies behind the White House.
Capture Point C: Courtyard
The Courtyard, nestled by surrounding buildings, is tricky and requires a good combination of offense and defense to hold. It can be shut down from nearly all avenues of approach and main entryways can be walled off by Fortifications, forcing enemies to fight through or blow up interiors. Still, defenders can be cornered, surrounded, and flushed out by a well-timed push
Capture Point D: Ruins
Ruins is an open space of rubble, and a preview of what’s to come. The buildings have been mangled into a maze of splintered wood and charred foundation. Soldiers will play the most dangerous hide-and-seek game here, challenging the entries from the east and north sides with Fortifications. The capture area is relatively small for a Conquest match, making Ruins one of the most challenging to capture.
Capture Point E: Willemsbridge
This Flag is a war on two fronts, of sorts. Fight to control one of two levels, the car garage below or the open road above. This is the Axis forces first spawn point, so expect a rotating exchange of infantry skirmishes to be settled in the garage. Get to the upper deck on one of two staircases, where you’ll likely find tanks testing their armor.
Not much cover outside of a few abandoned vehicles here, but like other Rotterdam Points it can be Fortified with barricades and gun emplacements. This area is relatively safe when compared to the other ambush-heavy alleys found throughout the map, just don’t get too comfortable.